<\/HEAD>
あなたの学校では、カリキュラムの一部としてEsriトレーニングコースを使用したクラスを提供しています。<\/P>
<\/P>
教授としてのあなたの責任の一つは、学生がEsri Academy<\/A>、Esriのトレーニングサイトにアクセスできるように学生のアカウントを設定することです。トレーニングを受けるためには、学生はMy Esriであなたの組織に接続されている必要があります。この接続により、Esri Academyは学生がどの組織に属しているかを認識します。<\/P><\/P>
以下の方法でこれを実現します。<\/P>
<\/P>
Training Sub Adminになる<\/H2>My Organizations > Overview > Request Permissionsのフォームを使って、あなたの組織のMy Esri管理者に許可を依頼してください。すでにMy Esriの完全な管理権限(つまり、Assign permissions<\/STRONG><\/SPAN> Administrator<\/STRONG>権限)を持っていない場合のみ、この手順が必要です。<\/P><\/P>学生を管理できるようにするために、Assign training permissions<\/STRONG>権限を付与するよう依頼してください。この権限を持つユーザーを私たちはTraining Sub Admins<\/STRONG>と呼びます。<\/P><\/P>なぜ権限が必要なのか?My Esriでは、権限があなたと学生がサイトとどのようにやり取りするかを決定します。権限はあなたを組織に接続するものです。<\/P><\/P>あなたの組織のMy Esri管理者はあなたのリクエストを通知され、許可を付与します。許可付与後、トークン付きのメールが届き、そのトークンを使ってMy Esriに接続する方法が説明されています。指示に従うと組織に接続され、次のステップへ進めます。<\/P><\/P> <\/P><\/P><\/P>学生を招待する<\/H2>あなたがMy Esri上で組織のTraining Sub Adminになったので、My Organizations > Users > Invite Usersから学生への招待状を送信してください。<\/P><\/P>招待したい各学生のメールアドレスを入力します。<\/P><\/P>メールアドレスは一つずつ入力するか、リストをコピー&ペーストして入力欄に貼り付けることもできます。または、Upload Users<\/STRONG>を使ってカンマ区切り値(CSV)またはMicrosoft Excel(XLXS)ファイルをアップロードできます。最良の結果を得るには、ファイルは1列のみで各行または行ごとにメールアドレスがあるべきです。<\/P><\/P>一度に最大1000人まで招待可能です。<\/P><\/P>
 <\/P><\/P><\/P>メールアドレスが正しくフォーマットされていない場合、それらは無効としてマークされます。一つずつXボタンで削除するか、すべて無効なアドレスを一括で削除するにはRemove invalid email addresses<\/STRONG>をクリックしてください。すべて有効なアドレスになるまでNext<\/STRONG>は無効になります。<\/P><\/P>
If youve entered an email address of a user who is already connected to your organization, My Esri will let you know. Its OK to leave these matched users on the list; they will be granted the e-Learning permission if they didnt have it already.

You can both add addresses from a file and input them manually until you are satisfied with the list.
Once all of the email addresses are valid, click Next.
Step 2 is for specifying which permissions to grant. However, since you are a Training Sub Admin, you can only set one permission to your students: Access e-Learning. Since this is the only permission you can grant, the other permissions arent shown.
Most students only need to be connected to the schools account for the duration of the class. If you want to limit the time frame in which your students can take classes for your school, set a time limit.

As it states on this step, users whose permissions have expired will automatically be disconnected from your organization 30 days after the End Date. This relieves you from having to disconnect possibly hundreds of students at the end of each term. Should your class be extended, or should your students continue on in another class, you can update all of their time limits at once. More on that below.
Once you have the time limit set, its on to Step 3.

Heres your chance to add a Tag. These tags can help you keep your student lists organized. Later on, when you view your list of students on My Organizations / Users / Manage Users, youll be able to distinguish one set of students from another. However, this is optional.
If your students use a different language than the one you are using in My Esri, you can select any of the supported languages for your invitation.
You can include a custom message in your invitation. This message will appear in a separate box in the invitation. This is optional.
You can add a note that will appear in the My Organizations / Users / Permissions Log for full admins to see. This is also optional.
Use Preview Email to Users to see the full text of the invitation email, along with any custom message your provide, in the language you selected. When youre doing looking over the Preview, click the X in the upper corner of the popup preview window.

You can go back to a previous step at any time to make changes if you missed anything. Either click Back or click the step number along the top of the form.
Once you are satisfied with all the parameters, send the invitations.
トークンとEsriアカウントについて
Esri Academyでトレーニングを受けるには、各学生が公開Esriアカウントを持っている必要があります。
そのアカウントのユーザー名とパスワードは、招待メール内のトークンを受け入れる際に使用します。事前にEsriのウェブサイトesri.comにアクセスし、右上隅のSign Inをクリックしてこの公開アカウントを作成しておくべきです。
後で学生は同じSign InリンクからEsri Academyにサインインしてコースを受講できます。


各招待メールには固有のトークンが含まれており、My Esriはこれで各学生を識別します。複数人でコンピューターを共有している場合は、そのトークンに割り当てたいアカウントでサインインしていることを確認してください。
各トークンは一度しか使用できません;共有は禁止されています。
メールにはサインイン後にトークンを手動で入力する方法も説明されています。
トークンは発行から6週間以内に受け入れられなければなりません;6週間以上未使用の場合は削除されます。学生が受け取るメールにもこの旨記載されていますが、授業最終週まで待たず早めに受け入れるよう注意喚起する必要があります。
学期終了後はどうする?
学期や四半期またはクラスが終了し、学生が組織へのアクセス不要になった場合、そのアクセス管理にはいくつか選択肢があります。
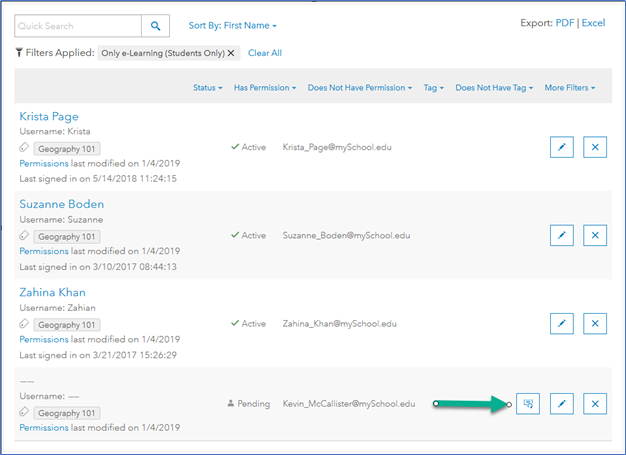
My Organizations > Users > Manage Usersから事前フィルタされた学生リストを見ることができます。タグや権限が有効か保留中かなどでさらに絞り込むことも可能です。
ここから各学生個別に編集できます。
有効なアカウントとは学生がトークン承認済みの場合であり、保留中とはまだ承認していない状態です。保留中の場合はResend Invitation(招待再送)機能が使えます。
 {}</>P
Remember that the students connection to your organization will be removed 30 days after the last day in the time limit you set.
A connection is removed when all of the permissions to an organization are removed. Note that this does not delete their public Esri Account the Account remains. The student can use that account for other purposes it belongs to them.
If you want all those students removed on that day, no further action is needed.
If only a few students will carry over into a new class, use Edit Permissions (鉛筆アイコンをクリック)して時間制限を延長します。そうすれば、新しい終了日の30日後まで接続が切断されません。<\/P>
<\/P>
学生があなたのクラスを辞めた場合は、いつでもX<\/STRONG>をクリックして接続を切断できます。<\/P><\/P>すべての学生を一度に更新するには、Permission Bulk Update<\/STRONG>を使用します。このツールは、Manage Users<\/STRONG>およびInvite Users<\/STRONG>と同じUsersサブタブにあります。<\/P><\/P>編集できるユーザーのリストは、e-Learning権限を持つユーザーに限定されています。ウィザード形式のフォームを使って、学生の権限に対してこれらの操作を行います。<\/P><\/P> <\/P><\/P>例えば、クラスが延長され、Geography 101クラスのすべての学生の時間制限に1週間追加したい場合です。<\/P><\/P>Set a new time limit<\/STRONG>をクリックします。新しい時間範囲の入力を求められます。それを入力して次のステップに進みます。<\/P>これらすべてのユーザーにタグ付けしたので、Tag Filterを使ってリストを絞り込みます。更新したい学生の横のチェックボックスにチェックを入れます。すべての学生を選択する必要はなく、一部だけ選択することも可能です。ただし、フィルターバーのチェックボックスで現在のページ上のすべての学生を選択した場合、そのページのみが選択されるため、すべての学生を選択するには各ページに移動して確認してください。<\/P><\/P>このウィザードのステップ3はInvite Usersのステップ3と非常によく似ています。ログ用のメモを指定したり、ユーザーにカスタムメッセージを送信できます。またここで学生にメールを送るかどうかも決められます。Send email to user<\/STRONG>でNo<\/STRONG>を選択すると、メールは送信されません。<\/P><\/P>ステップ4(Summaryページ)で選択内容を確認します。フォーム上部のステップナビゲーションやBackボタンで必要に応じて変更できます。その後、Set Time Limitをクリックして指定した変更を適用します。<\/P><\/P>トラブルシューティングとヒント<\/H2>あなたの組織には管理者がいません。<\/STRONG> 組織にフルMy Esri管理者がいない場合、権限リクエストは米国組織の場合はEsriカスタマーサービス担当者(CSR)へ、それ以外の場合は販売代理店へ送信されます。彼らがリクエストを処理します。<\/P><\/P>私にはどんな権限がありますか?<\/STRONG> My Profile > Profile Overviewから既に付与されているすべての権限を見ることができます。Connected Organizationsセクションでは接続している各組織ごとにカードが表示されます。そのカード内(またはExpand/Collapse All)で権限内容を展開して確認してください。<\/P><\/P>学生がEsri Academyにサインインするとメンテナンスエラーが出ます。 <\/STRONG>CSRまたは販売代理店に連絡し、組織のメンテナンスが最新であることを確認してください。My EsriのAsk a Questionフォームから連絡可能です。<\/P><\/P>学生のトークンが期限切れです。<\/STRONG> 学生が送られたトークンを受け取るまでに時間がかかりすぎた場合、新しいトークンを再送する必要があります。再度招待してください。<\/P><\/P>私はフル管理者ですが、これもできますか?<\/STRONG> もちろんです!このドキュメント内のすべての指示はTraining Sub Adminsとフル管理者(Assign Permissions Administrator <\/STRONG>権限保持者)の両方に適用されます。違いは途中でより多くのツールや権限が見えることだけです。<\/P><\/P>My Esri以外でも学生管理しています。この件についてもっと情報はどこで得られますか? <\/STRONG>以下のリソースは企業全体ソリューション管理について理解しやすくし、ArcGIS Onlineから学生管理する方法も説明しています。<\/P>Managing Enterprisewide Access to Esri E-Learning<\/A>Education edition: How do students access ArcGIS Online with EVA code?<\/A><A href="https:\/\/www.esri.com\/training\/unlimited-esri-training\/\


